December 16, 2009

Sew Cute: Felt Food!

Since my youngest doesn't read this blog I think it'll be okay to show you what I've been making him for Christmas. Shhh! Don't tell him about it!

Several weeks ago the boys and I went to the library while my hubby went to a political meet and greet. My little guy played almost the whole time with some little dishes and play food. We haven't had play dishes since my daughter was little! We have had plastic play food before, but it has slowly gotten smashed or turned into outside toys, so when I saw some felt food on a blog not too long ago I knew I had found a new project!

That little felt food was just so cute! So I looked around and found a free pattern for a sandwich. I didn't have much luck finding free patterns for any of the other foods but there were plenty of pictures and it's not rocket science so I winged it!

Everything came out even cuter than I expected. I just used the cheap felt you find in the craft section of any craft store. I used the sewing machine for most of the stitching but enjoyed a little hand stitching on some of the pieces too! I already had the embroidery floss and the felt costs a mere 20 cents so basically this cost me next to nothing... except for my time, of course, which is almost more precious than money these days. Almost.

So, are you hungry? How about a bologna and cheese sandwich on white?

Or would you rather have peanut butter and jelly?

Need something a bit more sweet? How about some milk and cookies? Or donuts?
No. You like more healthy food. Okay, how about some fruit?

Skipped breakfast? Here's a hearty breakfast for you...
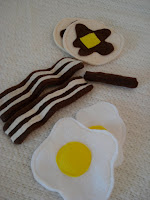
Need a protein boost...

This food is all that and a bag of chips...

Here's a shot of everything:

I didn't get a picture of the swiss cheese or the sesame seed hamburger bun which were still being worked on when I took these photos. Too late to take a picture now though, I already packaged up the whole set and wrapped it.

We got him a little set of plates and pots to serve up his food. To top it all off I'm making a little fabric stove top similar to the one shown here so he can "cook" something if he feels like but we don't have to worry about a real play kitchen. I hope my little guy enjoys it and if he doesn't... well, I'll play with it myself!

December 7, 2009

Google Voice


This post will fall into the "good stewardship" category. Using the money my husband works so hard to earn wisely is one of my main goals in life. If you make any long distance phone calls and are paying for them on your (landline) phone plan, I highly recommend that you get a Google Voice number. GV has a lot of features that I think are worth having but the best in my opinion is free long distance. Calls anytime, anywhere in the US won't cost you a penny.

I don't make too many long distance calls but for the few I do the fees ad up quickly. Several years ago I started asking for calling cards for birthday and Christmas gifts, so except for the few times I forgot to use the calling cards, I haven't paid for long distance. But now that we have free long distance I find I am more willing to pick up the phone and call our family/friends in Arizona for little things. It's been a lot of fun!

Using GV for long distance is a lot like using a calling card. There are a few extra buttons to push but I'm more than willing to do that to save the money. Once you have a Google Voice number set up it is easy to make a long distance call. You simply call your GV number (which is a local number) and enter a PIN. From there you can dial the number and GV will connect you.

If you have a blog you can put a widget on your blog for others to call you for free. They just enter their number in the widget box and GV will call them first and then you!

There is a lot more to Google Voice than free long distance. With a GV number you get:
  • One number: a single phone number that rings all your phones
  • Free SMS: send, receive & store text messages online
  • Block calls: send unwanted callers straight to voicemail
  • Record calls: record phone calls and store them online
  • Conference calls: join several people into a single call
  • Screen callers: hear who is calling before you pick up
If you want to know more here's a short video:

Google Voice is free. You can request an invite here. If you request one from Google I'm not sure how long it is currently taking... maybe a week or two. Or if you know someone with a GV number already they can "invite" you.

How about you? Do you have Google Voice? Do you use it? Like it? Ever heard of it?

December 6, 2009

Easy Christmas Potpourri Recipe

This will make your house smell like Christmas and it's super easy! Let me know what you think if you give it a try...

One orange, cut up
1-2 cinnamon sticks
2 bay leaves
2 tsp. whole cloves
water
If you have a potpourri simmering pot just put the above in it with water to cover. If you don't have a potpourri pot you can
just put it in a small pot (with about 2-3 cups of water)
on the stove burner set to low.
Keep an eye one it and refill the water as needed.

December 4, 2009

Crochet Edge Around a Fleece Blanket Instructions


This is one of my favorite gifts to give as a new baby gift or at a baby shower. But this blanket is not limited to baby gifts! Fleece comes in an amazing number of patterns these days. You could make one of these blankets for anyone!

If you know how to crochet it's very easy to make and works up quickly. I am by no means a crochet expert. I taught myself out of book a few years ago. I still have trouble reading patterns so I hope these instructions make sense! If you make one of these blankets I'd love to see it! (Send me a picture at nolongerconforming*at*gmail.com)

If you don't know how to crochet and would like to learn there are some great instructional videos on YouTube. Just borrow or buy a crochet hook and some yarn and sit by your computer for an hour or two learning a few basic stitches. If you can chain, single, and double crochet you can make this blanket!!

  1. Find some fleece that you would like to make into a blanket. I like to get enough to make the blanket square but you can make it any size or shape you would like. I make my blankets with only one piece of fleece, but you could use two pieces sandwiched together (similar to making the fleece blankets that you tie).
  2. Buy yarn that compliments your fleece. When I make a baby blanket it ends up being about 58 inches square and one skein is more than enough.
  3. Prepare the fleece. There are several ways you can do this. You can blanket stitch around the entire piece of fleece. You can use a serger to serge around the piece and then crochet in the serger stitching. Or you can go through and make holes around the edge of the fleece. This is the method I use. I use a ruler/tape measure of some kind and washable marker to make marks 1/4 inch apart about 1/4 inch in from the edge around the entire blanket. If you have a small (1/16) hole punch you could use that to make the holes. I use a seam ripper and just poke it through the fleece at every mark. With this method as you are crocheting you'll occasionally come to a hole that has closed up (or that you skipped) and you'll have to punch it again. I don't know why this happens, but it does, so just keep the seam ripper handy so you don't have to wander off to go find it and realize you have dishes to wash or something! :)
  4. Now comes the fun part!! Once all the holes are ready. Single crochet into each hole all the way around the fleece rounding the corners by putting 3 single stitches in each corner. There is no need to count and when it comes to the second round you'll be fudging the numbers a little to get it to come out even. Chain three when you get to the end to get up to the next row.
  5. The second row will be: double crochet, double crochet, chain one (repeat). Your chain will count as the first double, then double crochet again into the single crochet below it. When you chain, skip a stitch on the single crochet row so you get a little space between the two doubles. (Is this making sense?) For corners: 2dc, ch3, 2dc. These spaces make a great place to weave in a ribbon for an extra special touch. Chain one to get up to the next row after you've gone around.
  6. The third row is the hardest. This row makes a cute, little bumped edging. Single crochet in the first double below then in the "hole" or space you created in the second row make one single crochet, chain two, and another single crochet. Repeat. So it will be *sc, sc, ch2, sc, sc* repeat around the outside edge. For the corners: sc, ch2, sc, sc, ch 2, sc. When you get all the way around finish it off. If you have to add a few stitches or skip a few to make it come out even it won't matter. Just play around with it a bit until it looks right.
Fold up your blanket, tie a ribbon around it, and give it as a gift. Who wouldn't want a cuddly, made with love, blanket?!

[Click any of the picture above to enlarge if you need to see better. If you have questions feel free to leave a comment or email me.]

December 2, 2009

Snow Cocoa

If you are doing any holiday entertaining I highly recommend this very easy but very delicious beverage! I always bring it to our annual Mother's of Multiples Christmas party. I think I might get kicked out of the club if I didn't bring it. It has become a tradition! It's a white hot chocolate...

Snow Cocoa
2 cups whipping cream
6 cups milk (I use 2%)
1 teaspoon vanilla
12 oz. white chocolate chips

Put in crockpot and heat on low for 2 hours. Stir well to blend.
Garnish with marshmallows if desired.

The hardest part about making it is getting it to the party. Carrying a crockpot full of hot liquid is always an adventure but this year at least I won't be walking over any ice! The high Thursday is supposed to be a balmy 34 degrees!